Creating a Window
Welcome to the first entry to the LearnOpenTK tutorials. This guide will teach you how to get OpenTK from NuGet, and open your first window. This will be a short one, we promise.
Installing from NuGet
OpenTK is shipped on NuGet, the official package manager for .NET. Here is the url. OpenTK 3 can be installed on .NET Framework 2.0, and any derivative Mono version.
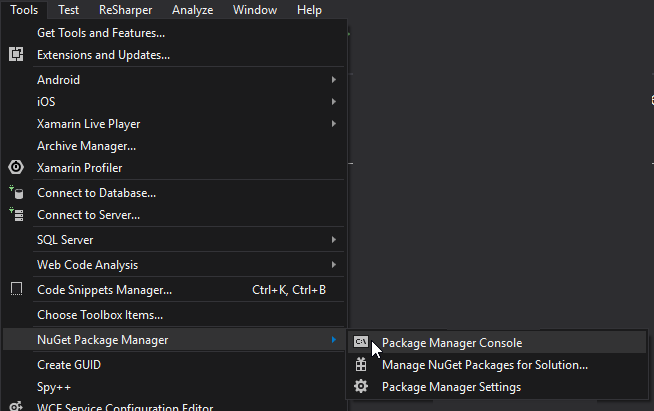
In Visual Studio 2013/2015/2017, to access the NuGet package manager simply click on TOOLS, hover over NuGet and select Package Manager Console

This will bring up the Package Manager Console - a PowerShell extension for Visual Studio and NuGet. To install OpenTK, simply type the following command into the Package Manager Console.
Install-Package OpenTK

And that's it! OpenTK is installed and you're ready to proceed with the next tutorials!
Creating a window
Unlike OpenGL, OpenTK comes with its own windowing system. This tutorial will teach you how to use it. Go ahead and make a C# console project in your favourite IDE, and make a new file called Game.cs, and add the following using directives:
using OpenTK.Graphics.OpenGL4;
using OpenTK.Windowing.Common;
using OpenTK.Windowing.Desktop;
using OpenTK.Windowing.GraphicsLibraryFramework;

namespace YourNamespaceHere
{
    public class Game
    {

    }
}
Now we have a blank class. Time to turn it into a GameWindow. To do that, simply extend GameWindow, like so:
public class Game : GameWindow
Now your class is a basic window. This is good, but by itself, you can't do anything with it. There are plenty of ways you can customize your GameWindow, but in this tutorial we're going to create a simple constructor to let us set the width, height, and title of the window.
We do this by setting Size and Title properties of NativeWindowSettings.
public Game(int width, int height, string title) : base(GameWindowSettings.Default, new NativeWindowSettings() { Size = (width, height), Title = title }) { }
Your GameWindow is ready to go! Now all you have to do is create an instance of it in your program. When you created your project earlier, it should have also created a file named Program.cs, containing a Main function. To open your window when the program starts, we must:
- Create an instance of your
Gameclass - Start all the pumps by calling the
Runfunction - After we're done, dispose the
Game.
// This line creates a new instance, and wraps the instance in a using statement so it's automatically disposed once we've exited the block.
using (Game game = new Game(800, 600, "LearnOpenTK"))
{
    game.Run();
}
Plug that code into your Main function, then build and run your program! You now have a blank window, great job! However, the only way you can close your window is by using the cross (X) button or Alt+F4. We don't want that, Let's do a little bit of input handling!
GameWindow has plenty of methods that you can override to add all sorts of functionality to your window. You can look at the "API" section of this website to look at them all, but in this case the one we're interested in is OnUpdateFrame.
By just typing override OnUpdateFrame your IDE should be able to generate a function like this one:
protected override void OnUpdateFrame(FrameEventArgs e)
{
    base.OnUpdateFrame(e);
}
It's really simple to detect key presses! OpenTK has a class called KeyboardState with an IsKeyDown method, which returns true if a key is pressed. For example, KeyboardState.IsKeyDown(Key.Escape) will only return true if the escape (Esc) key is pressed.
We want to exit when the escape key is pressed, and with the above information is in mind, exiting when the escape key is pressed is as easy at this:
//Get the state of the keyboard this frame
// 'KeyboardState' is a property of GameWindow

if (KeyboardState.IsKeyDown(Keys.Escape))
{
    Close();
}
Now, the function should look like this:
protected override void OnUpdateFrame(FrameEventArgs e)
{
    base.OnUpdateFrame(e);

    if (KeyboardState.IsKeyDown(Keys.Escape))
    {
        Close();
    }
}
Review
In this tutorial, we installed OpenTK, created a blank window that listens for the escape key being pressed, and exits when it is. In the next tutorial, we'll draw a triangle on this blank window you've just created. That's all for now!